Geofences are virtual rings drawn around a location on your maps. With YourMapp, geofences are invisible to users and allow you to trigger automated messages to users and send push notifications based on user location.
Frequently Asked Questions
Geofences
What are geofences?
In YourMapp, we have two uses for geofences, called Activation Zones and Geofences

Activation zones
are a virtual rings drawn around any of your maps. You can set the size of the ring and optionally add a message to welcome your users when they arrive within that area. Activation zones are also used in our Globe plan to segment your push notifications based on user location
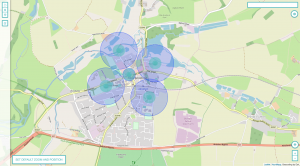
Geofences
are virtual rings you can draw on specific locations within a geographic map. You can add multiple geofences to a single map, which trigger a message when users walk inside them. Please read about the limitations to ensure you get the most from your geofences.
How to I create a geofence?
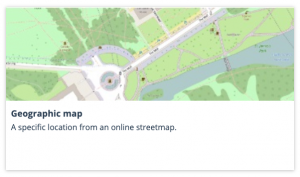
- Use a geographic map
Geofences require a geographic map, so that we can place them in the real world. Choose one of your geographic maps or create one. If you don’t want a geographic map in your app, just create one specifically for geofences called ‘Alerts’ – you can exclude it from your app’s menu via the menu designer.
- From your geographic map, choose the geofence icon
 from the sidebar. A little pulsing dot will appear next to your cursor – simply click on the map where you want to place your geofence.
 - Name your geofence
This is just a name for you to identify your geofence from the others. - Set the radius
Choose how large you want your geofence to be. We recommend a minimum radius of 50m for maximum reliability but feel free to change and test different settings. - Create your event
Triggering a geofence will fire an event to your users’ phones. First, set your push notification – this is what will appear on your users’ lock screens. Secondly, set your pop up heading, content and image – these will be displayed inside the app when your users tap on the notification. Finally, you can link to a map or page. For example, if your geofence is over the coffee shop, add a link to its page within the app. - Create your geofence
That’s it! Hit the big blue button and your geofence will be saved. We recommend you go and test it on the YourMapp Preview app, then when you’re happy with it, send to your users by publishing the content.
Can I change the geofence messages?
Yes! You’re always in full control of your content with YourMapp. Geofences are updated when you publish your content, so users will need to receive the update and install it before the geofences are registered. If you’re looking to send something a little more instant, consider using push notifications, which are sent directly to the app without the need to publish. On our Globe plan, you can even send push notifications to visitors at specific locations!
Geofence limitations
Indoor usage
Device location is determined by a combination of wifi triangulation and GPS and the reliability of this can reduce significantly when indoors. Depending on your venue, you will find that results can vary. We’d recommend setting up some geofences and testing them using the YourMapp Preview app for their accuracy. We’d recommend using a fairly large geofence radius, to increase the chances of it triggering.
Size
It’s a common question – “how big can a geofence be?” “how small can my geofence be?”. The simple answer is that your geofences can be as big as you like – you could map the entire world if you wanted but it’s worth thinking about whether you could achieve the same results with a global push notification to your users. How small your geofence can be is however influenced by a number of factors. Technology limitations across devices and operating systems, combined with local GPS/Wifi strength mean that the reliability of your geofence being triggered can vary. We tested the reliability of geofences extensively when building them into YourMapp and we have the following advice:
- A reliable minimum radius is 50m – we found that this performed the most consistently across platforms and locations
- Avoid overlapping or putting geofences too close together – your users might get confused by lots of geofences triggering as they walk around
- Don’t make your notifications too specific – don’t rely on the geofence having triggered in the perfect location. Instead of saying “You’re stood next to the doughnut cart – here’s an exclusive offer for you” perhaps say “Can you smell doughnuts? Make your way to the doughnut cart with this exclusive offer!”
- Always test! Use our YourMapp Preview app to test your notifications before publishing them live to the app
How many?
We tested geofences across both iOS and Android and found that 20 geofences was the maximum number that ensured consistent behaviour across both platforms. We’re constantly reviewing this but 20 geofences should be plenty to engage your customers as they walk around. Don’t forget, you can always move, edit, remove or add geofences – they’re updated in the app when you publish your content.